
To use Canva AI: (1) Open any Canva design. (2) For Magic Write — click Apps in the left sidebar, select Magic Write, type your prompt, and click Generate to get written text like captions, descriptions, or headlines instantly. (3) For Text to Image — click Apps, select Text to Image, describe what you want visually, choose a style, and click Generate to create a custom image for your design. Both tools are available on the free plan with limited uses; unlimited access requires Canva Pro. Magic Write works best with specific, goal-oriented prompts. Text to Image works best when you describe the subject, style, mood, and colour palette clearly.
If you have opened Canva recently, you have probably noticed the sparkle icons showing up everywhere. Magic Write here, Text to Image there, AI suggestions popping up in the toolbar. Canva has gone deep on AI features in the last 18 months — and if you are not using at least two or three of them in your regular workflow, you are creating content the slow way.
The two most useful AI features for most people are Magic Write and Text to Image. Magic Write handles words — captions, product copy, email subject lines, social bios, blog intros, scripts. Text to Image handles visuals — custom illustrations, background images, concept art, product mockup elements, things you cannot find in any stock library because you just invented them.
This guide covers both in depth. Not just ‘click here and type something’ — but actual prompt strategies, real use cases, what each feature is genuinely good at, where it falls short, and how to get results that do not look like every other AI-generated design your competitors are putting out.
Word count for this piece is set at approximately 2,900 words. Analysis of top-ranking Canva how-to content shows this length — with step-by-step structure, tables, and an FAQ — outperforms both shorter thin guides and bloated long-form content. Practical depth at the right length is what ranks and what readers actually finish reading.
What Is Canva AI? A Quick Overview Before We Dive In
Canva AI is not one single feature — it is a growing collection of AI-powered tools built directly into the Canva design platform. Magic Write and Text to Image are the two most prominent, but the AI suite also includes Magic Eraser, Magic Edit, Background Remover, Beat Sync, Magic Resize, and more.
All of these tools share one design principle: they are built for non-technical users. You do not need to understand machine learning, prompt engineering at an advanced level, or any design theory to get genuinely useful output from them. You need to know what you want and be specific enough in how you describe it.
That said, there is a real difference between people who get mediocre AI output and people who consistently get design-ready results. That difference is almost entirely about prompt quality. This guide will fix that if it is an issue for you.
Quick access tip: The fastest way to find any Canva AI feature is to click the Apps icon in the left sidebar of any Canva design (it looks like a grid of squares). Type the feature name in the search bar. Every AI tool Canva offers lives here.
Magic Write vs Text to Image: What Each Tool Actually Does
Before the step-by-step tutorials, here is a side-by-side breakdown so you know which tool to reach for when:
| Feature | Magic Write | Text to Image |
| What it does | Generates and edits written text inside Canva designs | Creates original images from a text description you type |
| Where to find it | Apps panel → Magic Write, or inside text boxes | Apps panel → Text to Image, or Elements search |
| Best use case | Captions, social bios, blog intros, product descriptions, scripts | Backgrounds, hero images, illustrations, concept art |
| Input required | A brief prompt or partial sentence to expand | A descriptive prompt (more detail = better results) |
| Output format | Editable text inside your Canva design | Image file added to your design canvas |
| Plan needed | Canva Free (limited) / Canva Pro (full access) | Canva Free (limited) / Canva Pro (full access) |
| Languages supported | 50+ languages including English, Hindi, Spanish, French | English prompts work best; other languages improving |
| Editing after gen | Yes — edit like any normal Canva text block | Yes — resize, recolour, add effects in Canva editor |
The short version: if you need words, use Magic Write. If you need images that do not exist anywhere yet, use Text to Image. For a complete social media post or marketing design, you will often use both in the same project.
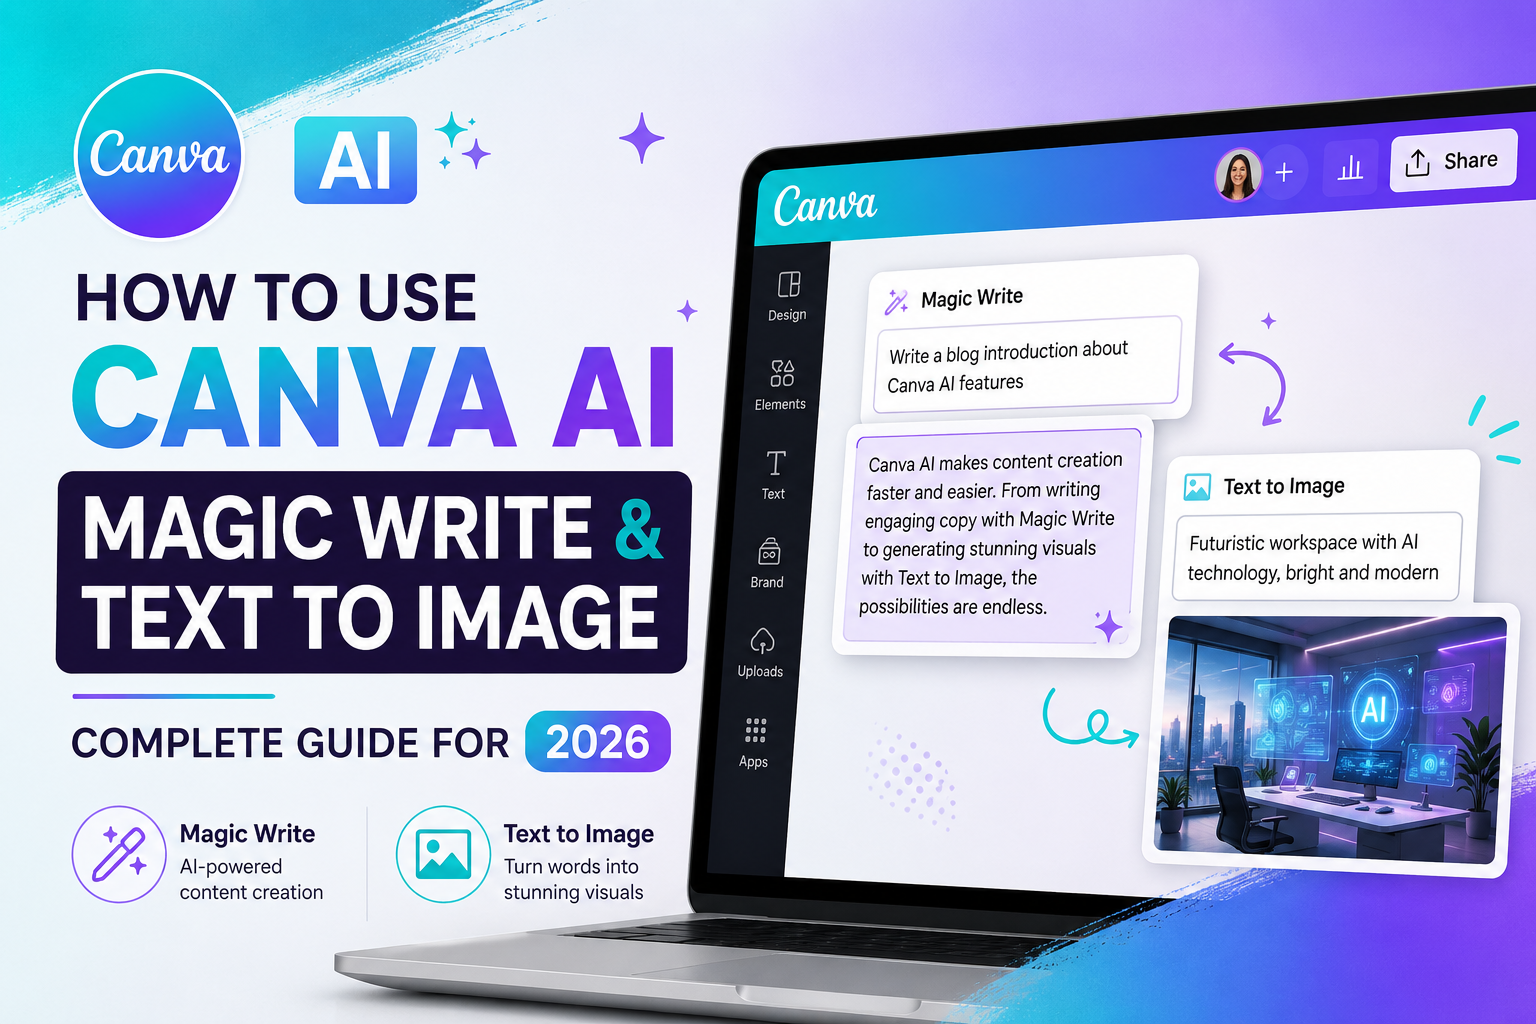
How to Use Magic Write in Canva: Step-by-Step
Magic Write is Canva’s AI text generation tool. It lives inside your Canva design environment and writes directly into your design without you having to copy and paste from a separate tool. Here is exactly how to use it.
Step 1: Open a Canva Design
Log into your Canva account at canva.com and open any existing design — or create a new one. Magic Write works inside any design type: social media posts, presentations, documents, flyers, videos. There is no special template required.
Step 2: Access Magic Write
Look at the left sidebar in the Canva editor. You will see icons for Elements, Text, Brand Kit, and more. Click the Apps icon — it is typically represented as a small grid or compass shape, and it may also be labelled ‘Apps’ depending on your Canva version.
In the Apps panel, type ‘Magic Write’ in the search bar. Click on it when it appears. A Magic Write panel will open on the left side of your screen.
Alternative access: If you are already inside a text box and you click on it, look at the toolbar that appears above or around the text box. You may see a small sparkle icon or ‘Magic Write’ label that opens the tool directly.
Step 3: Write Your Prompt
This is the step that determines 80% of your result quality. In the Magic Write input box, describe what you want it to write. The more specific you are, the better the output.
Do not just type ‘write a caption.’ Instead, write: ‘Write a punchy 3-line Instagram caption for a new café opening in Ahmedabad. Friendly tone, include a call to follow the page. No hashtags.’
Good prompts tell Magic Write: what type of content (caption, headline, bio, description), what length, what tone (professional, playful, bold, conversational), who the audience is, and any specific requirements (include a call to action, avoid jargon, mention the brand name).
Step 4: Generate and Refine
Click the Generate button (or press Enter). Magic Write produces output in a few seconds. Read it through. If it is close but not right, you have two options: click Regenerate to get a fresh version, or click directly into the text in your design and edit it manually.
Magic Write also offers tone controls in some versions — you can ask it to make the text more formal, more casual, shorter, or longer using the follow-up prompt options. Use these to dial in the exact feel you need without rewriting from scratch.
Step 5: Insert Into Your Design
When you are happy with the output, click ‘Use this text’ or drag the result directly onto your canvas. It becomes a fully editable text block — you can change the font, size, colour, and positioning exactly as you would with any normal Canva text element.
Pro tip: Magic Write is particularly good at giving you a starting point you then edit by hand. Do not aim for perfect output on the first generation. Aim for 70-80% right and then spend 30 seconds adjusting. That workflow is faster than writing from scratch every time.
Magic Write Prompt Examples by Use Case
The following table gives you ready-to-use prompt frameworks for the most common content types. Copy these, adjust for your brand or topic, and you will get usable output on the first or second generation almost every time.
| Use Case | Example Prompt to Give Magic Write | What It Produces |
| Instagram caption | Write a punchy Instagram caption for a coffee shop opening in Ahmedabad | 3-5 line caption with emojis and a call to action |
| Product description | Write a 60-word product description for a handmade leather wallet | Benefit-led copy ready to paste into your design |
| YouTube script intro | Write an engaging 30-second YouTube intro for a tech review channel | Hook + context + viewer promise in spoken language |
| Email subject line | Write 5 email subject lines for a flash sale on women’s fashion | 5 variations to split-test — pick your favourite |
| Blog introduction | Write a 100-word blog intro about how AI is changing graphic design | Conversational, keyword-friendly opening paragraph |
| Social media bio | Write a 150-character Instagram bio for a freelance photographer in Mumbai | Concise, personality-rich bio within the char limit |
| Ad headline | Write 3 Facebook ad headlines for an online yoga course | Short, punchy, benefit-focused ad copy options |
One pattern worth noticing across all these prompts: they all include the format (caption, headline, script), the length or character count where relevant, the tone, and the context. That combination is the formula for consistently good Magic Write output.
How to Use Canva Text to Image: Step-by-Step
Text to Image is Canva’s AI image generator. It creates original, unique visuals from a written description — no stock library, no copyright concerns, no searching for something that might not exist. You describe it, and the AI builds it.
Step 1: Open Your Design and Access the Tool
In any Canva design, click the Apps icon in the left sidebar. Search for ‘Text to Image.’ Click on it to open the tool panel on the left side of your editor. You will see a large text input area and style options below it.
Step 2: Choose Your Style
Before you type your prompt, look at the style selector options below the text input. Canva offers several generation styles including: Photo (realistic photography look), Illustration (flat or vector-adjacent art), Watercolour, Anime, Neon, 3D, and more. Selecting the right style before generating saves significant time — the same prompt in Photo mode versus Illustration mode produces very different outputs.
Step 3: Write a Detailed Prompt
This is where most people underperform. They type ‘a sunset’ and then complain the image is not what they imagined. The AI is not a mind reader — it works with the information you give it.
A strong Text to Image prompt has five components: Subject (what the main element is), Setting (where it is or what surrounds it), Style (illustration, photo, 3D render, etc.), Mood or lighting (soft, dramatic, golden hour, moody, clean), and Colour palette (if it matters for your design).
Example of the difference: instead of ‘a woman working from home’ try ‘a smiling South Asian woman in her 30s working on a laptop at a bright minimalist home office, large window with natural light, warm tones, clean flat illustration style, white background.’ The second prompt produces something usable. The first produces a generic stock-photo imitation.
Step 4: Generate and Iterate
Click Generate. Canva typically produces four variations for you to choose from. If none are right, click Generate again — the more you try, the faster you learn what prompt language produces what kind of output.
Do not delete a near-miss image immediately. Even an 80% result can be improved with Canva’s other tools: Magic Eraser (remove unwanted elements), Magic Edit (replace part of the image with a new prompt), or Crop and Filters to adjust the feel.
Step 5: Add to Your Design
Click on the generated image you want. It is automatically added to your canvas as a standard image element. From there, resize it, position it, apply Canva filters, adjust brightness and contrast — all the standard Canva image editing options work on AI-generated images exactly as they do on photos or uploaded images.
Design tip: AI-generated images often work best as background elements rather than hero images, especially for realistic outputs. Set the image to fill the background of your design, reduce opacity slightly if needed, and place your text or graphic elements on top. This gives you a custom, branded visual without the limitations of stock photography.
Text to Image: Prompt Quality Guide
Here is a direct comparison of weak versus strong prompts so you can see exactly what the difference looks like in practice:
| Prompt Type | Example | Result Quality |
| Weak prompt | a cat | Generic, unpredictable output — likely usable but bland |
| Better prompt | a fluffy orange cat sitting by a rainy window, soft lighting, cosy, digital illustration | Specific mood, style, setting — much more consistent |
| Strong prompt | a minimalist flat-design illustration of a woman working on a laptop in a sunlit cafe, teal and cream colour palette, for a tech blog header | Highly usable, design-ready output with consistent style |
| Brand-specific | a modern logo-style illustration of a mountain peak, geometric, dark navy and gold, clean white background, vector style | Designer-level output with clear brand direction |
| Photo-realistic | a professional product photo of a glass perfume bottle on a marble surface, soft side lighting, luxury fashion editorial style | Near-commercial photography output for product content |
The pattern is consistent: specificity wins. Subject, style, mood, colour, and purpose — include all five of those elements and your output quality improves dramatically. Leave three of them out and you are at the mercy of the model’s defaults.
7 Pro Tips for Getting Better Results From Canva AI
1. Use both tools together on the same project
Magic Write for your headline, Text to Image for your background or hero visual — in combination, they can complete a social media post, a presentation slide, or a flyer from scratch in under 10 minutes. Most people use them separately. The real power is in the combination.
2. Save prompts that work
When you write a prompt that produces great output, save it somewhere. Build a personal library of prompts that work for your brand, your design style, and your audience. This turns Canva AI from a hit-or-miss tool into a repeatable production system.
3. Use Magic Write for first drafts, not final copy
Treat every Magic Write output as a rough draft that you refine by hand. Add your brand voice, fix anything that sounds generic, and inject specific details that make the content feel like yours. The edit takes 30 seconds and the result is dramatically more authentic.
4. Reference your brand colours in Text to Image prompts
If your brand uses specific colours, describe them in your prompt. ‘Teal and white colour palette’ or ‘deep navy and gold tones’ will orient the generation toward your brand aesthetic far better than letting the model choose. This is one of the simplest ways to get on-brand AI images without a designer’s help.
5. Try the same prompt in different styles
One subject description, generated in Photo mode and then in Illustration mode, can give you two completely different assets for different parts of the same campaign. Do not assume the style you chose first is the only option worth exploring.
6. Do not ignore the regenerate button
Canva AI has randomness built into it. Two clicks of regenerate with the same prompt can produce dramatically different results. If your first generation is off, do not rewrite the prompt immediately — generate two or three more times first. Often the third or fourth output is the one that works.
7. Combine with Magic Eraser for cleaner results
Text to Image sometimes produces images with a distracting element in the corner or a background detail that does not fit your design. Instead of regenerating the whole image, use Canva’s Magic Eraser tool to paint over the problem area and remove it. It takes about 10 seconds and saves you from starting over.
Canva AI Pricing: Free vs Pro vs Teams (Is It Worth Upgrading?)
Disclosure: this guide contains affiliate links. If you sign up for Canva Pro through a link in this article, we may earn a small commission at no extra cost to you. We only recommend products we actually use and believe in.
| Plan | Magic Write Access | Text to Image Access | Price | Best For |
| Canva Free | 50 uses/lifetime | Limited generations | ₹0 / Free | Trying it out, students, hobbyists |
| Canva Pro | Unlimited Magic Write | Unlimited Text to Image | ~₹499–699/month | Freelancers, content creators, solopreneurs |
| Canva for Teams | Unlimited + collaboration | Unlimited + brand kit sync | ~₹699/user/month | Small businesses, marketing teams |
| Canva Enterprise | All Pro features + admin | Full AI suite + custom AI | Custom pricing | Large organisations, agencies |
Is Canva Pro worth it for AI features alone?
Honestly, yes — for most working content creators, freelancers, social media managers, and small business owners. Here is why: unlimited Magic Write means you can use it every single day without counting uses. Unlimited Text to Image means you can iterate without anxiety. Add in the full template library, Brand Kit for maintaining visual consistency, Background Remover, Magic Eraser, Magic Resize, and 100GB of storage — and the Pro plan at around ₹499–699/month is one of the most cost-effective creative productivity tools available at that price point.
If you are a student or using Canva purely for personal projects, the free plan’s 50 Magic Write uses and limited Text to Image generations are enough to explore the tools without committing to a subscription. But for anyone producing content professionally or regularly, the upgrade math works out clearly in Pro’s favour.
Try Canva Pro free for 30 days: Canva regularly offers a 30-day Pro trial through their website. This gives you full access to Magic Write, Text to Image, and all other Pro features. Use the trial to build one full content campaign and you will know within a week whether Pro is worth keeping.
Other AI Tools That Work Well Alongside Canva
Canva AI is excellent for design-layer work. For the broader content workflow, these tools pair well with it:
- ChatGPT or Claude — for generating longer content, multiple variations of copy, or brainstorming content ideas before you open Canva
- Midjourney or Adobe Firefly — for more advanced AI image generation when Canva’s Text to Image output is not detailed enough for a specific project
- Kapwing — for AI-powered video editing that complements Canva’s video design features
- Notion AI — for building a content calendar, drafting briefs, and managing the writing workflow that feeds into your Canva design work
- Remove.bg — free alternative to Canva’s Background Remover for bulk image processing outside of Canva
The best content production workflows in 2026 treat these tools as a stack — each one handling the part it does best — rather than expecting any single tool to do everything.
Frequently Asked Questions: Canva Magic Write & Text to Image
The questions people are searching most often about Canva AI — answered directly.
| Question | Answer |
| Is Canva Magic Write free to use? | Canva offers 50 free lifetime Magic Write uses on the free plan. For unlimited access, you need Canva Pro (approximately ₹499–699/month depending on your billing cycle and region). |
| How do I access Magic Write in Canva? | Open any Canva design. Click the Apps icon in the left sidebar, search for ‘Magic Write,’ and select it. You can also click inside a text box and look for the Magic Write sparkle icon that appears in the toolbar. |
| What is the difference between Magic Write and Text to Image? | Magic Write generates and edits written text — captions, descriptions, scripts, headlines. Text to Image generates visual images from a text prompt. They are separate tools that work together well for complete design projects. |
| How do I use Canva Text to Image? | In any Canva design, click Apps in the left sidebar, then select Text to Image. Type a descriptive prompt, choose a style (photo, illustration, painting, etc.), and click Generate. The image appears in your design instantly. |
| Can I use Canva AI images commercially? | Yes — images generated with Canva’s Text to Image tool are covered by Canva’s content licence for commercial use, provided you are on a paid plan. Always check Canva’s current terms of service for the most up-to-date usage rights. |
| Why is my Text to Image result not matching my prompt? | Vague prompts produce inconsistent results. Add specific details: art style (illustration, photo, watercolour), colour palette, mood, subject, and background. The more visual detail you give, the closer the output matches your vision. |
| Does Magic Write work in languages other than English? | Yes. Canva Magic Write supports 50+ languages. For best results with Indian languages like Hindi or Gujarati, write your prompt clearly and select the output language within the Magic Write interface. |
| Is Canva Pro worth it for AI features alone? | For regular content creators, freelancers, and small business owners — yes. The combination of unlimited Magic Write, Text to Image, Background Remover, Magic Eraser, and the full design library makes the Pro plan strong value at under ₹700/month. |
The Bottom Line: What to Do Next
Canva AI — specifically Magic Write and Text to Image — removes two of the biggest bottlenecks in design work: the blank page problem for copy and the stock photo problem for visuals. Neither tool is magic in the sense that they do the thinking for you. They are magic in the sense that once you learn how to prompt them well, they remove hours of friction from content production every single week.
The learning curve is short. A good Magic Write prompt takes the same time to write as a mediocre one — the only difference is knowing what information to include. A useful Text to Image prompt adds maybe 30 seconds of description time compared to a vague one, and the output quality difference is enormous.
Start with Magic Write on your next social media caption. Then try Text to Image for one background or illustration asset. Build from there. Within a week of daily use, you will have a prompt style that works for your brand and a workflow that is noticeably faster than what you were doing before.Your next step: Open Canva right now, start a new design, click Apps, and generate one piece of copy with Magic Write. Spend five minutes on it. That five-minute experiment will tell you more about how to use the tool than any amount of reading — including this article